http://tuxgraphics.org/electronics

Introduction to the tuxgraphics TCP/IP stack, 3rd generation
![[Illustration]](../../common/images2/article09051/tuxgraphics-tcp-ip-stack.gif)
Abstract:
The tuxgraphics stack is the smallest and fastest TCP/IP stack. It
runs on microcontrollers as small as atmega88. It was designed with
web server functionality in mind and it has proven itself over many years.
We have now re-designed the API and in the following article you will
see how easy and straight forward the new web server API is.
We have also added web client functionality. That is: a "web browser" inside
the microcontroller.
Why should you need a web browsers? The answer is simple. It can be used
in a network of distributed sensors to report measurement data to
a central web server.
Something that is brand new in this stack is the possibility to send
email notifications such as "the temperature in the server room has reached
35'C".
The web client is also useful for micro-blogging. You can send updates to your
twitter/identi.ca account.
Exciting new possibilities.
_________________ _________________ _________________
|
Making efficient use of the hardware
Microcontrollers are, as the name already suggests, small. If you implement
a TCP/IP stack then you are limited by the available processing power and
especially the available RAM that such chip have. The stack has to be as small
as possible and you have to decided how you spend the available memory. Most
stack implementations introduced therefore a very low limit on the number of
parallel sessions. Typical values are 2-3 parallel web browser connections.
The tuxgraphics stack takes a different approach. There is no hard-coded
limit. Instead we limit the amount of data that a web page can hold to
one IP packet.
Small is cute, slim is fast
To limit the size of a web page to just one IP packet makes sense because
IP packets on ethernet can be as big as 1500 bytes. That is a lot
for microcontroller which has only 1024 bytes of RAM.
The benefit of this limitation is the outstanding speed and performance
you get. You notice when you have a tuxgraphics embedded web server
in front of you. It's a click and the response is there, instantly.
This tiny web sever which needs only about 0.5W of power can outperform
an big apache web server on a PC hardware. It can serve dozens of web
browsers in parallel.
Not an ordinary web server
Most people think of web servers as file servers. Boxes that provide
images and documents to the user. The tuxgraphics web server is not like
this.
It's a user interface to your microcontroller hardware. You can control
motors and relays or read out sensors. In this context you don't need
big web pages. A temperature sensor might provide something like "20'C".
That is only 4 bytes of actual information!
Using the tuxgraphics AVR web server interface
The new stack comes with a file called basic_web_server_example.c
which is a very simple web server example. Using this example I will explain how
the web server API works.
The stack consists of the files enc28j60.c and ip_arp_udp_tcp.c There are
also the header
files enc28j60.h, ip_arp_udp_tcp.h, net.h, ip_config.h timeout.h. To compile the code will need
the Makefile.
The file ip_config.h is used to configure the stack. If you want only a web
server and no client (=no web browser functionality) then you should undefine
all client functions in the file ip_config.h to save space. Open the file in a text
editor and read the comments. I think you will understand what to do.
The eth_tcp_client_server-3.x.tar.gz file from the download section of this
article has client functionality enabled because that tar.gz file
contains also other examples. The compiled basic_web_server_example.hex code is
therefore a bit bigger than it need to be because it contains unused code.
Let's look at the code of basic_web_server_example.c.
   1	#include <avr/io.h>
   2	#include <stdlib.h>
   3	#include <string.h>
   4	#include "ip_arp_udp_tcp.h"
   5	#include "enc28j60.h"
   6	#include "timeout.h"
   7	#include "avr_compat.h"
   8	#include "net.h"
   9
  10	// This software is a web server only.
  11	//
  12	static uint8_t mymac[6] = {0x54,0x55,0x58,0x10,0x00,0x29};
  13	// the web server's own IP address:
  14	static uint8_t myip[4] = {10,0,0,29};
  15
  16	// server listen port for www
  17	#define MYWWWPORT 80
  18
  19	#define BUFFER_SIZE 550
  20	static uint8_t buf[BUFFER_SIZE+1];
  21
  22	uint16_t http200ok(void)
  23	{
  24	        return(fill_tcp_data_p(buf,0,PSTR("HTTP/1.0 200 OK\r\n
Content-Type: text/html\r\nPragma: no-cache\r\n\r\n")));
  25	}
  26
  27	// prepare the webpage by writing the data to the tcp send buffer
  28	uint16_t print_webpage(uint8_t *buf)
  29	{
  30	        uint16_t plen;
  31	        plen=http200ok();
  32	        plen=fill_tcp_data_p(buf,plen,PSTR("<pre>"));
  33	        plen=fill_tcp_data_p(buf,plen,PSTR("Hi!\nYour web server works great."));
  34	        plen=fill_tcp_data_p(buf,plen,PSTR("</pre>\n"));
  35	        return(plen);
  36	}
  37
  38	int main(void){
  39	        uint16_t dat_p;
  40
  41	        // set the clock speed
  42	        CLKPR=(1<<CLKPCE);
  43	        CLKPR=0; // 8 MHZ
  44	        _delay_loop_1(0); // 120us
  45
  46	        //initialize the hardware driver for the enc28j60
  47	        enc28j60Init(mymac);
  48	        enc28j60clkout(2); // change clkout from 6.25MHz to 12.5MHz
  49	        _delay_loop_1(0); // 60us
  50	        enc28j60PhyWrite(PHLCON,0x476);
  51	        _delay_loop_1(0); // 60us
  52
  53	        //init the ethernet/ip layer:
  54	        init_ip_arp_udp_tcp(mymac,myip,MYWWWPORT);
  55
  56	        while(1){
  57	                // read packet, handle ping and wait for a tcp packet:
  58	                dat_p=packetloop_icmp_tcp(buf,
                             enc28j60PacketReceive(BUFFER_SIZE, buf));
  59
  60	                /* dat_p will be unequal to zero if there is a valid http get */
  61	                if(dat_p==0){
  62	                        // no http request
  63	                        continue;
  64	                }
  65	                // tcp port 80 begin
  66	                if (strncmp("GET ",(char *)&(buf[dat_p]),4)!=0){
  67	                        // head, post and other methods:
  68	                        dat_p=http200ok();
  69                          dat_p=fill_tcp_data_p(buf,dat_p,
                                       PSTR("<h1>200 OK</h1>"));
  70	                        goto SENDTCP;
  71	                }
  72	                // just one web page in the "root directory" of the web server
  73	                if (strncmp("/ ",(char *)&(buf[dat_p+4]),2)==0){
  74	                        dat_p=print_webpage(buf);
  75	                        goto SENDTCP;
  76	                }else{
  77	                        dat_p=fill_tcp_data_p(buf,0,PSTR("HTTP/1.0 401 Unauthorized
\r\nContent-Type: text/html\r\n\r\n<h1>401 Unauthorized</h1>"));
  78	                        goto SENDTCP;
  79	                }
  80	SENDTCP:
  81	                www_server_reply(buf,dat_p); // send web page data
  82	                // tcp port 80 end
  83	        }
  84	        return (0);
  85	}
The interesting part starts on line 12 and 14. It defines the IP address and
the MAC address of this device. The MAC address has be unique in your
own LAN your neighbor could re-use the same numbers.
Let's jump to lines 41-51. Here the hardware and ethernet layer is initialized.
You don't have to change anything. Line 54 initializes the actual web server
TCP/IP stack and you can leave it also as it is.
Microcontrollers do
normally not have an operating system. Line 56 is therefore "our operating
system". It is an endless loop that executes one by one the tasks that need to
be performed. The most important task here is to wait for incoming packets.
This is line 58. enc28j60PacketReceive get's the packet from the driver and
packetloop_icmp_tcp is the actual stack which returns the position (dat_p) of
the http data in variable buf if there is a request for a web page.
Line 66 handles all request but an actual http-get.
If there is an actual http get then we go to line 73 and check if the web browser
was asking just for the root web page. If you web server is at 10.0.0.29 then
this root page would correspond to the URL http://10.0.0.29 . Web browsers ask theses days
for all kind of things such as favicon.ico files or crawlers ask for robots.txt.
It is therefore important that we return a http error code 401 for such things
(line 77).
On line 74 we call the previously defined function "dat_p=print_webpage(buf);"
which prints the actual web page into the variable buf. The variable buf has to
be big enough to hold the IP packet with the web page. You will notice when it
is to small as the web server stops then to work. The function
fill_tcp_data_p is used to fill the web page with data. fill_tcp_data_p takes
a hard coded string, "PSTR", which the compiler puts into flash memory only.
This saves RAM. If you want
to print dynamic data (e.g sensor data) onto the web page then you use
fill_tcp_data (without the _p). fill_tcp_data takes a normal C-string as
argument.
The actual web page which we produce in the function print_webpage looks like this:
  <pre>
  Hi!
  Your web server works great.
  </pre>
In your web browser it looks then like this:
  Hi!
  Your web server works great.
When we return from print_webpage then we go to line 81 where the web page is sent back to
the requesting web browser.
That's all.
Smart web page design
There is nothing really special about web pages for embedded web servers.
What you need to do is write an efficient web page. It does not make
sense to display a temperature reading like "20'C", which is
a 4 byte string, on a huge web page. So DON'T do this:
  <!DOCTYPE html PUBLIC "-//W3C//DTD HTML 3.2//EN">
  <html>
  <head>
    <title>Awful web page</title>
  </head>
  <body>
    <pre>
  Temperature: 20'C
  </pre>
  </body>
  </html>
This page consumes 160 bytes and there are 4 bytes of information.
So how do we get rid of all the
"information garbage"? Fortunately there are default values for
many html-tags if they are omitted. The best web pages are anyhow
those that would display on any browser and do not require a
special document type or structure. We can therefore reduce
the web page a lot and the end result is the same:
  <pre>
  Temperature: 20'C
  </pre>
This page is only 30 bytes long and it is exactly the same as
the 160 bytes page. The <pre> tag means that the text
is pre-formated. A single new line character (\n) we already cause
a line break. This is more efficient than a <br>-tag.
If you add a second sensor and a re-fresh button then the page
would just look like this:
  <pre>
  Indoor : 20'C
  Outdoor: 16'C
<a href=.>[refresh]</a>
  </pre>
A nice clean page that renders fast in any web browser and is instantly
transmitted over the network.
The ethernet remote switch application (control a relay remotely)
The file main.c (see download eth_tcp_client_server-3.x.tar.gz) implements a
more complicated web server. A web server which can be used to switch
a relay remotely on or off. It is essentially the same as
2006-11: HTTP/TCP with an atmega88
microcontroller (AVR web server) just re-written for the new stack.
So if you are looking for an example that is more complicated than
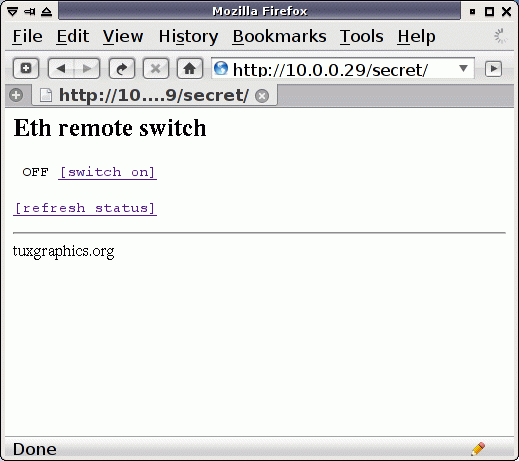
basic_web_server_example.c then open main.c. The web page to switch on/off a
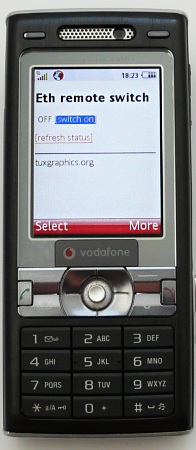
relay remotely looks like this:
... on a mobile phone:
The idea of a web client
We have seen that a web server makes really sense for displaying data from
a microcontroller. A web page is a great user interface and can be a machine
interface at the same time.
Why would we need a web browser inside a microcontroller?
The problem is especially that most many web pages are huge, hundreds of
kilobytes. What do we do with all those bytes in chip that has only 1Kb to
store the data?
Web browsers can also be used to up-load data. You notice this when you
go shopping on the internet and enter you address or you use google to
search.
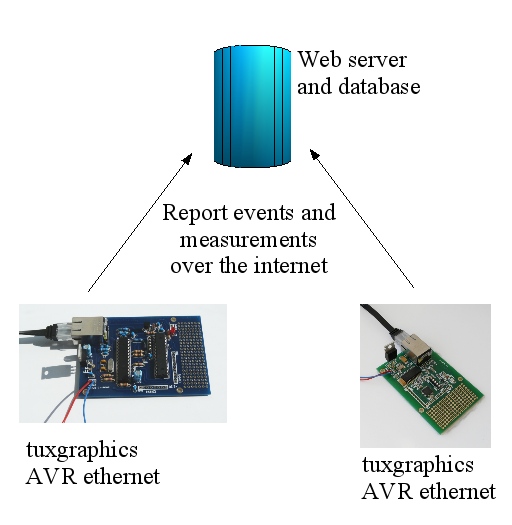
The plan is to use the ethernet board to upload measurement
data and other information to a web server. The response from the
web server to where we up-load would then mainly be ignored. We
could read a status code indicating success or failure and we could
read a date or other small pieces of information but the bulk of
the resulting web page would be discarded.
This idea especially convenient
when you have multiple distributed sensors. Just plug them into any
DSL router and they could report measurement data once a day. Microcontrollers
have already timers/clocks inside. To program them to upload data once every
hour or once every day is very easy.
How web browsers work
We should study how web browsers work before we go into the implementation
details of a micrcocontroller embedded web browser. It is very easy to
understand and test by using telnet. Try this. Open a telnet session
to www.ietf.org (where all the internet standards are) on port 80.
and then type:
GET / HTTP/1.0
Host: www.itef.org
User-Agent: tgr/1.0
Accept: text/html
After this hit twice return. What happens is this:
telnet www.itef.org 80
Trying 63.119.44.197...
Connected to www.itef.org.
Escape character is '^]'.
GET / HTTP/1.0
Host: www.itef.org
User-Agent: testing/1.0
Accept: text/html

HTTP/1.1 200 OK
Date: Wed, 29 Apr 2009 11:53:54 GMT
Server: Apache/2.2.3 (CentOS)
Set-Cookie: COOKIE=10.5.16.253.1241006034372969; path=/
ETag: "AAAASDUwzCY"
Last-Modified: Thu, 23 Apr 2009 20:55:43 GMT
Vary: Accept-Encoding,User-Agent

.... the web page continues here ....
By using telnet on port 80 we connect to the web server. We tell it that
we want the root page "GET /". A web server might host many sites. Therefore
we need to specify to which site hosted on that server we would like to get.
This is the "Host: www.itef.org" line. In "User-Agent:" we specify what
kind of web browser we are and after that which data formats we can accept.
The web server responds then to our request after the empty line.
Uploading HTML Form-data
In the above example we have seen how to download a web page. How do we
upload data? The easiest way to do that is to encode the data into
the URL. This called GET-method. The data is grouped into key words
and values and comes after a ?-sign. Data fields are separated by an ampersand.
Like this: "formPage?sensor1=20&sensor2=15". Instead of the "/" after
the GET in the above telnet example we would specify this string.
A playground to test your software
To use this web client you would need a web server. If you do not
yet have such a server and you want to test your embedded web client
then you can use http://tuxgraphics.org/cgi-bin/upld . You can test it
by typing a url like this in your browser:
http://tuxgraphics.org/cgi-bin/upld?sensor1=20&sensor2=15
After that you can point your browser to http://tuxgraphics.org/cgi-bin/upld
(without the question mark) and you can see what was uploaded.
Give me an example
The file test_web_client.c (see tar.gz archive in the download section) implements
such a web client uploading data to http://tuxgraphics.org/cgi-bin/upld.
Set the appropriate IP addresses in test_web_client.c, compile it and then
download test_web_client.hex to the microcontroller on the ethernet board.
The software implements just an example and reports by whom it was ping-ed to
http://tuxgraphics.org/cgi-bin/upld. So ping the ethernet board once and then
check at http://tuxgraphics.org/cgi-bin/upld what was uploaded. You will see
the ip address from where you ping-ed the board. It is not a very useful application
but it is an example that does not need any special sensors or other hardware.
This is what the data looks like on the upld test site when the board was ping-ed from 10.0.0.7:
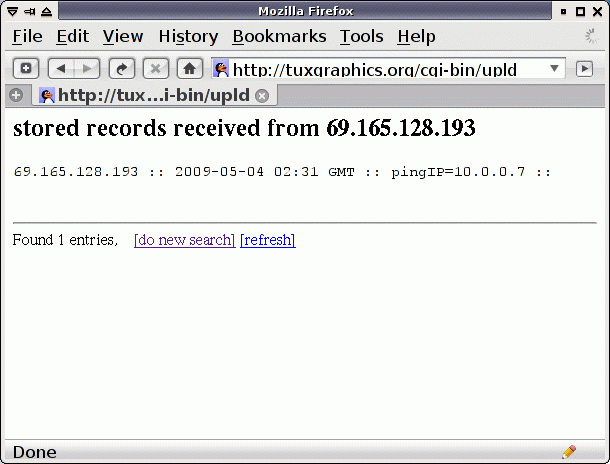
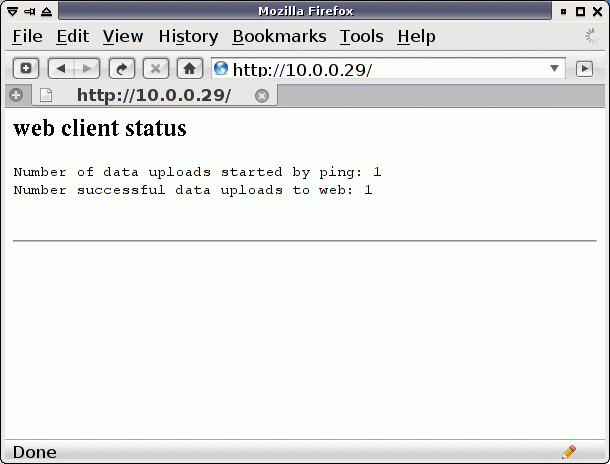
The ethernet board with the web client runs also a web server. This way we can
see what is going on:
Using the web client
You find all the needed code in test_web_client.c but I explain
the main points.
To use the web client software you need to configure a number of IP
addresses. First the board's own IP address and the MAC address. It's the same
as for the web server:
 static uint8_t mymac[6] = {0x54,0x55,0x58,0x10,0x00,0x29};
 static uint8_t myip[4] = {10,0,0,29};
You will also need to define 3 more things:
 // IP address of the web server to contact:
 static uint8_t websrvip[4] = {77,37,2,152};
 // The name of the virtual host which you want to contact at
 // websrvip (hostname of the first portion of the URL):
 #define WEBSERVER_VHOST "tuxgraphics.org"
 // The default gateway. The internal ip address of your DSL router:
 static uint8_t gwip[4] = {10,0,0,2};
After that you initialize the web client:
      client_set_gwip(gwip);
      client_set_wwwip(websrvip);
You also define a function which will be called up-on successful contact with
the web server. If you are not interessted in the result then you can
use an empty function or ... you can just turn off an LED. Like this:
void browserresult_callback(uint8_t statuscode,uint16_t datapos){
      LEDOFF;
}
Now your are ready to use the browser to upload FORM-data. You need a trigger
to do that. In the example it is a ping. It can also be a timer (e.g once a day) or
it can be a sensor reaching a threshold. Whatever it is, you just call
the a function called client_browse_url with some parameters and this
web browser will upload the data. If you monitor a sensor threshold then make sure you implement
a state and a hysteresis to prevent permanent sending of data while the
value fluctuates around the threshold.
The idea of using email
 Now we have seen that we can report data to a web page. It would also be
nice if one could receive notifications about important things via email.
It would be possible to implement an email server in a microcontroller but
there are too many people abusing the internet. These days mail servers
block mail or mark it as spam if it comes from boxes that are not meant to be mail servers. We
need therefore a better solution.
Prevent SPAM !
If you happen to have a mail server and you look at the mail headers of the latest
spam messages then you will find that they all origin from virus infected
windows PCs running in somebody's DSL network. The Microsoft operating system is contributing
to the distribution of a huge amount of spam every day. Here are e.g 10 SPAM
mails that I got today:
dsl85-107-56265.ttnet.net.tr
101.74.116.73.hathway.com
dsl.static.85-105-27576.ttnet.net.tr
79.subnet125-161-188.speedy.telkom.net.id
dsl88.245-3254.ttnet.net.tr
adsl-pool2-209.metrotel.net.co
107.221.broadband3.iol.cz
81.184.199.70.dyn.user.ono.com
athedsl-06612.home.otenet.gr
p508c26fc.dip0.t-ipconnect.de
The owners of those PCs don't usually know what is going on inside their property.
Almost all better email service providers have therefore started to block
mail servers which do not have a proper DNS PTR record or origin from
network addresses that are not meant to be used as mailservers. Many ISPs that care about
their networks block for this reason direct SMTP (=email) services from DSL customers in the firewall. To send an email
directly from your home DSL line is therefore not an option. We have to get the
mail first to an official mail server and then send it out. For this we use the
web client code.
Getting notifications via email
You can purchase now from the tuxgraphics shop a microcontroller mail account (http://shop.tuxgraphics.org/mm.html). This account can be
configured and you can specify to which email address messages from the ethernet board should
be forwarded. The example test_emailnotify.c implements e.g a solution where you have a push button
or switch connected on the AVR ethernet board between PD6 and GND. You could connect this switch e.g
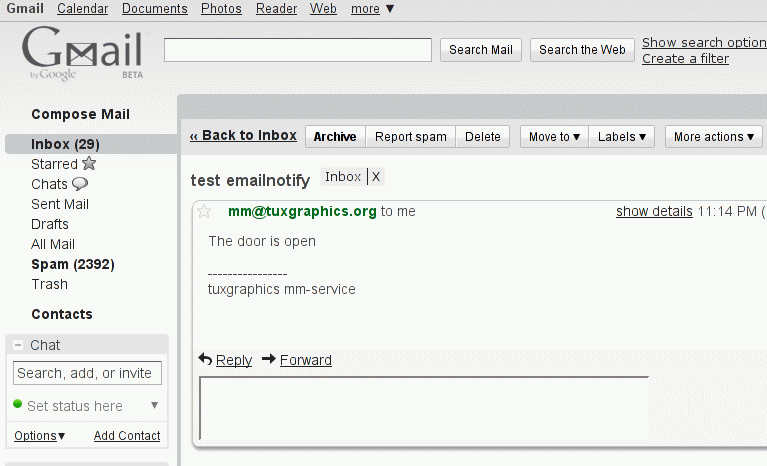
to a door. When the switch is closed then an email notification is sent and you get "the door is open"
delivered to your GMail inbox or any other email account:
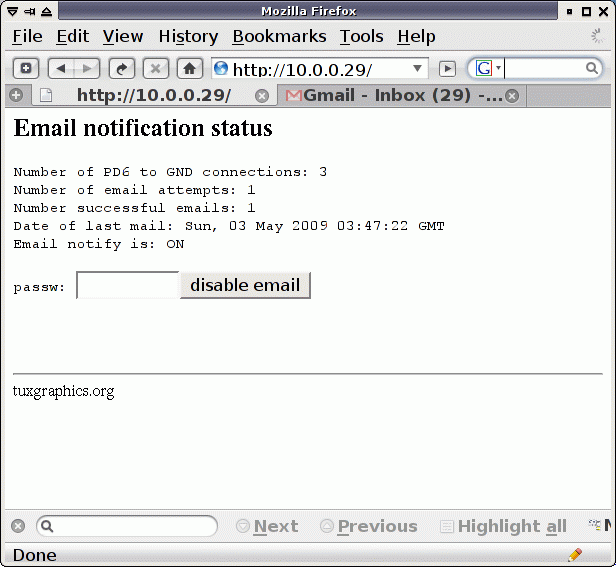
test_emailnotify.c has also a timer to prevent flooding with mail. A second mail is sent no
earlier than 3 minutes after the frist mail. The ethernet board runs in addition a web server so
you can remotely monitor statistics and stop email notifications:
You need to enable port forwarding in your DSL router to be able to get to the web server running on the ethernet board from outside your home DSL network. Many brand name DSL routers have such functionality.
Twitter.com, Identi.ca
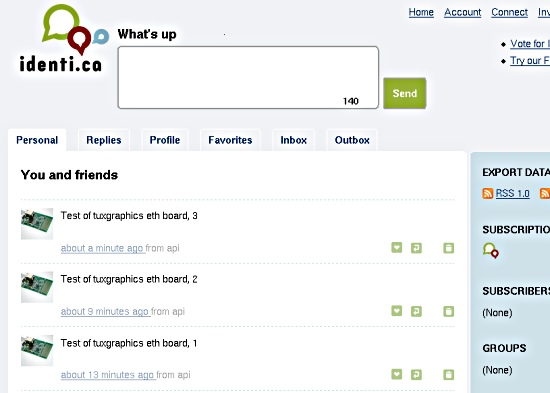
The twitter/identi.ca interface is implemented in version eth_tcp_client_server-3.3.tar.gz
and higher. The example code that sends a message to twitter is
test_twitter.c File test_identi_ca.c implements an identi.ca example. You need to edit and modify it with you account
information as described in the README.htm. The file README.htm is part of the
source code.

Conclusions
It was a lot of work to re-design the IP stack but
we enjoy the result.
It's really cool!
Version 4.0 is out, Feb 2010
The version 3.X code originally presented has now been updated and enhanced
further. The new additions are:
- generic udp client code
- generic TCP client interface
- length parameter to the browser callback function (Note: this is
a change which is not backward compatible to the 3.X code).
- a dns resolver
Version 5.0 is out, Feb 2012
The client code has received a major overhaul. Included is now
a DHCP client. This makes it possible to design boards which
need no manual configuration. Very exciting stuff!
You can expect more articles
with dedicated applications using the new client code.
Included in the eth_tcp_client_server-dhcp-5.0.tar.gz package is
already an example that uses DHCP and uploads measurement of
analog voltages periodically to a server.
References/Download
- Download section. Note
that each tar.gz file has detailed explanations in a file called
README.htm.
- The avr ethernet board and the microcontroller mail subscription is available in our online shop: shop.tuxgraphics.org
© Guido Socher, tuxgraphics.org
2012-02-05, generated by tuxgrparser version 2.57
![[Illustration]](../../common/images2/article09051/tuxgraphics-tcp-ip-stack.gif)


 Now we have seen that we can report data to a web page. It would also be
nice if one could receive notifications about important things via email.
It would be possible to implement an email server in a microcontroller but
there are too many people abusing the internet. These days mail servers
block mail or mark it as spam if it comes from boxes that are not meant to be mail servers. We
need therefore a better solution.


