home |
electronics |
toolbox |
science club |
tuxtalk |
photos |
e-cards |
online-shop

Content:
By Guido Socher
<guido_at_tuxgraphics_org>
|
Why a LCD display?
Originally I wanted to write the next article about a weather
station based on the avr web server. Based on a request from a
customer I decided then to develop this circuit first. The
weather station comes next. There are a number of interesting
aspects/problems here which could also be useful for developing
other circuits.
- Most LCD displays want 5V. The avr web server uses
3.3V
- The simple "switch on/off a relay" circuit which was the
only function provided by the avr web server until now did
not require HTML-forms. I used simply 2 URLs
http://baseurl/password/1 for switching on and
http://baseurl/password/0 for switching off. This does not
work anymore for the display as we want to type a text into a web page
which should then be shown on the display. What is needed is
a needed is a proper decoding of HTML form data.
The circuit
Most HD44780 compatible displays need 5V DC. The 5V are however
mainly needed to get contrast on the display right and to power
the chips on the board. On the data lines those displays work
also with 3V signals without any problems. In other words it
should be no problem to attach the display to the general
purpose IO-port of our avr web
server ("ethernet remote device"). The display will be able
to handle the 3.3V signals coming from the atmega chip. How
about the other direction? The atmega can work with 5V signals
but only if it is also powered with 5V. Any voltages above 3.3V
would go into the atmega internal over voltage protection diodes
and if the current is too high it would damage them. A 100 Ohm
resistor in series could solve the problem. However how many
output pins does a HD44780 display have? This depends on the RW
line. If we pull RW to GND then all lines will be input lines
on the LCD side. The LCD driver code can then not ask the
display "are you ready?" but that is generally not a problem.
The driver can just wait a few milliseconds and the display
will have completed the command.
In other words the display can be connected straight to the
ethernet board without additional parts we just need 5V VCC for
the LCD display.
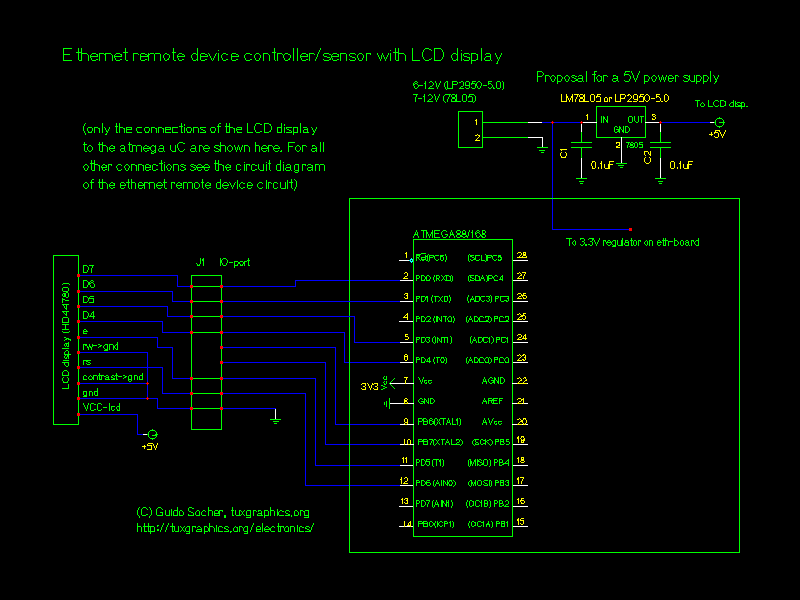
Click on the image to view the circuit as pdf file
The web interface
The web page that the avr web server will display is again
clean and simple with no unnecessary HTML code. To be able to
enter text lines a HTML form is needed. Something like this:
<form  METHOD="get" action="http://10.0.0.24/q">
<input type="hidden" name="cmd" value="2">
<input size="20" type="text" name="l1"><br>
<input size="20" type="text" name="l2"><br>
<input type="submit" value="write to LCD">
</form>
We use the HTML "get" method. In other words the data we enter
into the form arrives at the atmega chip again as a URL but
some characters will have a bit strange encoding. A single
space character will e.g be encoded either as "%20" or as "+"
dependent on the type of web browser you use.
The cmd parameter is used to branch in the code: cmd=0 or cmd=1
is used to switch off/on the optional relay and cmd=2 means
"update the text on the display".
This is how the web page looks like in firefox:
... and in a w3m text terminal web browser:
... to have some basic access control there is a login
page displayed before you enter the main page:
As you can see the "switch on/off a relay" functionality is
still there. The LCD is just an add-on. You can however remove
the "switch on/off a relay" easily if you don't need it.
URL-decoding and other building blocks
The main point about free software is not so much that it is
free of charge but that it provides the sources and therefore
access to the building blocks. You can just take those building
blocks and use them for your own ideas.
The code is available for download at the end of this article.
All smaller functions can be found in the file main.c. This is
also where you should start reading if you want to understand
the code.
URL decoding
This implemented in file main.c in function "void urldecode(char *urlbuf)". It
takes an URL encoded string and decodes it. It modifies the string
buffer handed to the function. Decoded strings are always
shorter than URL encoded strings. It needs the helper function
h2int() which converts a single hex digit into an integer.
// decode a url string e.g "hello%20joe" or "hello+joe" becomes "hello joe"
void urldecode(char *urlbuf)
{
        char c;
        char *dst;
        dst=urlbuf;
        while ((c = *urlbuf)) {
                if (c == '+') c = ' ';
                if (c == '%') {
                        urlbuf++;
                        c = *urlbuf;
                        urlbuf++;
                        c = (h2int(c) << 4) | h2int(*urlbuf);
                }
                *dst = c;
                dst++;
                urlbuf++;
        }
        *dst = '\0';
}
Finding Key value pairs from the HTTP "GET" method
If you have a web-form with a text field like
<input size="20" type="text" name="l2">
Then this arrives a the HTTP protocol level as something like
q?l2=TheTextYouTyped&OtherKey=OtherValue HTTP/1.1\r\n
We need a function to extract those key/value pairs (key=l2 and
value=TheTextYouTyped in the above example). One could either
write a function that runs through the string once and stores
the key/value pairs somewhere or one that searches for just one
key and extracts the value. The first solution needs more
memory to store all the key/value pairs and the later costs
more computing time as it needs to run through the string every
time. It's more important to save memory (the atmega88 has 1K
ram) therefore the later function is the better choice.
The function
uint8_t find_key_val(char *str,char *key) // in file main.c
take as first argument such a url-sting and searches for a key.
If a value is found then it is returned in the static "strbuf"
string buffer.
Interfacing the LCD
- lcd.c -- the main code for handling HD44780 displays,
don't modify it.
- lcd.h -- the functions you can use. E.g: lcd_clrscr() to
clear the screen. lcd_gotoxy() to go to a certain row or
character position. lcd_puts() to write a string to the
display.
- lcd_hw.h -- the hardware definitions. To which pins the
display is connected on the avr microcontroller.
Those are the main add-on blocks for things which are new
here. All other functions used are the same as in the normal
avr web server code.
Control via scripts
The web server displays a web page. That page is meant for
humans to enter the data. If you want a machine interface to
use this e.g from a different application then this might not
be the best choice. We use however the HTTP "get" method and
this provides automatically an easy to use machine interface.
The the command line web browser w3m
(http://sourceforge.net/projects/w3m/) can be used for that.
All commands need a password (default value is "secret"):
pw=secret
and a command e.g to switch on the relay:
cmd=1
Now you just put this together and use it via w3m:
w3m -dump "http://10.0.0.24/q&pw=secret&cmd=1"
To write something to the first display line the command is
cmd=2 and the text comes after l1:
l1=DisplayText
Now you just put this together and use it via w3m:
w3m -dump "http://10.0.0.24/q&pw=secret&cmd=2&l1=DisplayText"
This writes "DisplayText" onto the LCD. DisplayText needs to be
URL encoded. The most important characters to know here are
"&" which becomes "%26" and a single space which becomes
"+" in URL format.
What to do with an avr web server and an attached LCD
display?
Now you might ask "what to do with it ?". There are all kind of
uses for small LCD displays. People attach them via usb/rs232
or parallel port to computers. This one is attached via
ethernet. The advantage of ethernet is that you can have a much
longer cable. It does not have to be near the computer as in
the case of usb/rs232 or parallel port.
The display keeps the text even if the computer which sent the
text to that display is already detached from the net. You
could use it as a fancy electronic door plate or notice board
in your office.
As you can see there are many things one can do with it. The
most important point is perhaps that you have also the source
code and you can change and modify it slightly.
There is however one thing you should remember. The hardware
looks almost like a "complete computer" with just the keyboard
missing. Display, RAM and CPU, everything is there. That is
however an illusion. It's not even nearly a full PC. It's
mainly a LCD display with an ethernet cable.
Download and links
© Guido Socher, tuxgraphics.org
2007-04-01, generated by tuxgrparser version 2.55
![[Illustration]](../../common/images2/article07021/article07021_title.jpg)